Difference between revisions of "Hardware: Frame Assembly"
(→Cut Strut) |
(→Transfer Layout) |
||
| Line 32: | Line 32: | ||
===Transfer Layout=== | ===Transfer Layout=== | ||
Method 1: | Method 1: | ||
| − | # Place a load cell on the top of the rail. It should be about 4 mm (1/4") from the end. | + | # Place a load cell on the top of the rail. It should be about 4 mm (1/4") from the end. '''NOTE: If it is more than 4 mm from the end you will not be able to tighten the lock nut on the foot and the end cap will cover the closure strip.''' |
#Using a transfer punch, mark the two 8 mm mounting holes. | #Using a transfer punch, mark the two 8 mm mounting holes. | ||
#Repeat on the other end. | #Repeat on the other end. | ||
Revision as of 04:37, 6 December 2014
Contents
Material List
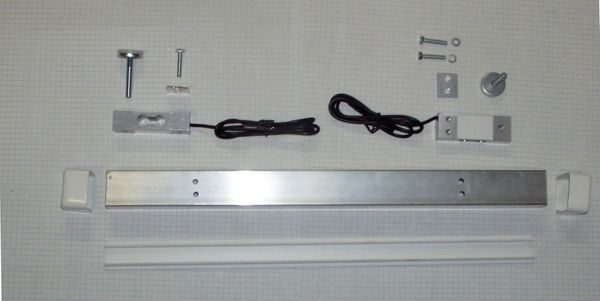
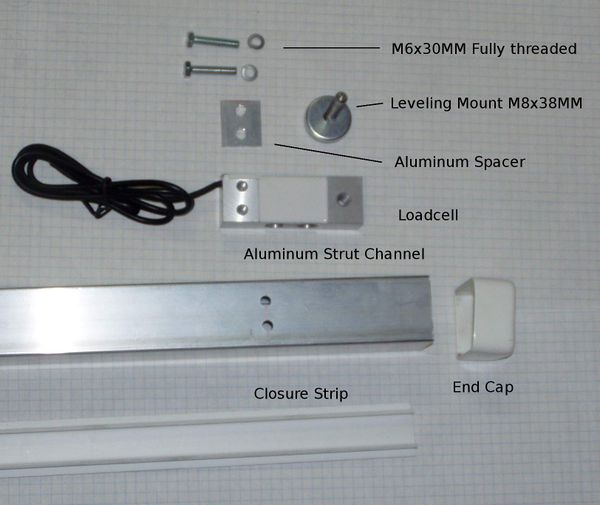
A detailed Parts List with part numbers, suppliers and prices is available in pdf. Strut is available from different manufacturers with different brand names: Unistrut, Superstrut, etc. It is available in galvanized steel, aluminum, and fiberglass. Closure strips are available in steel, aluminum or plastic.
If the scale will be shipped via UPS or USPS, even though the aluminum is more expensive, it will be cheaper when shipping expenses are considered.
Tools
- Tape Measure
- Pencil
- Layout or speed square
- Hacksaw
- Drill
- 1/4" drill bit
- Center Punch
- File
- 10 mm wrench
- 13 mm open end wrench
Optional tools:
- Metal cutting band saw or cut off saw
- Drill press
- Stationary disk sander
Rail Fabrication
Cut Strut
The strut needs to be cut in 20" lengths. Three can be cut from 5' strut, 6 can be cut from 10 foot lengths. After loosing the saw kerf, the rails may be slightly less than 20".
- Mark the strut using a tape measure, If using a hack saw, transfer the marks around the strut using a layout square.
- Carefully cut the strut on the lines, trying to keep as straight and square as possible.
Transfer Layout
Method 1:
- Place a load cell on the top of the rail. It should be about 4 mm (1/4") from the end. NOTE: If it is more than 4 mm from the end you will not be able to tighten the lock nut on the foot and the end cap will cover the closure strip.
- Using a transfer punch, mark the two 8 mm mounting holes.
- Repeat on the other end.
- Check the punch marks to make sure they are in a straight line.
- Punch the marks deeper using the center punch.
Drill, Debur
Drill the four 1/4 holes to mount the load cells. Use a file, deburring tool, or stationary disk sander to clean up the ends. They will be covered by the End Caps so they don't have to be perfect. Use a file or deburring tool to debur the holes.
Assembly
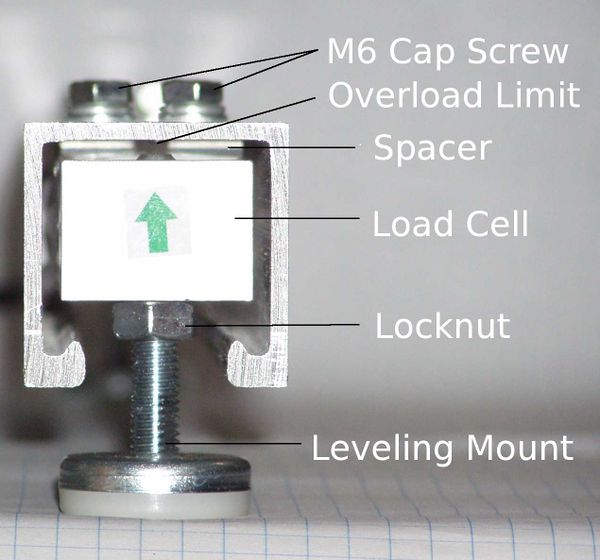
Place a rail upside down. Place the spacer over the holes. Carefully position the load cell over the holes without shifting the spacer.
NOTE: The green arrow on the end of the load cell should point down, toward the top of the rail.
Place a lock washer and flat washer on a M6x30mm bolt. While holding the load cell and spacer in place with one hand, start the bolt in one of the holes. Do the same for the other bolt. Make sure the load cell is centered in the strut and not touching the sides. Tighten the bolts.
Electrical Assembly
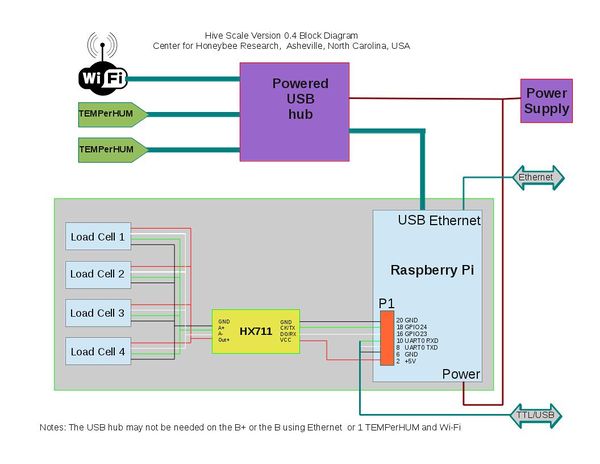
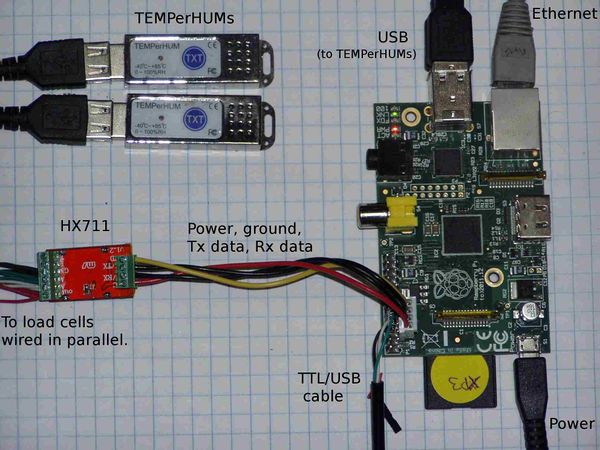
Block Diagram
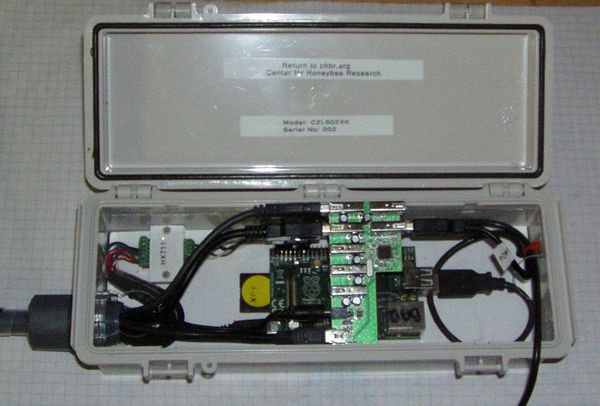
Enclosures
Several enclosures can be used.
Goals:
- Complete system parts cost under $100.
- Scale parts cost under $50 and are readily available.
- Low thermal drift and creep.
- Low power consumption.
- Overload protection.
- Automatically resumes operation after power failure.
- Can be built by 15 year old student (9th grader) using hand tools.
- No soldering.
- No lethal voltages.
Design Features
- No frame: no welding, no bending.
- Load cells are mounted in metal strut readily available from electrical or industrial suppliers in aluminum. galvanized or painted steel.
- Only straight cuts and drilled holes.
- All electrical connections are made with crimp plugs or terminal blocks.
Design Flaws
- The M6 Cap Screws stick up and require a spacer or mortising the bottom board (Use counter sunk flat head screws?).
- The leveling feet form the over limit protection and are not for leveling. If they are used to level, the over limit protection will break.
- The feet stick out from the rail and can damage the load cells if dropped or if improperly packed for shipping.

