Difference between revisions of "Hardware: PCB Assembly"
(→Assembly) |
(→Testing) |
||
| (55 intermediate revisions by the same user not shown) | |||
| Line 1: | Line 1: | ||
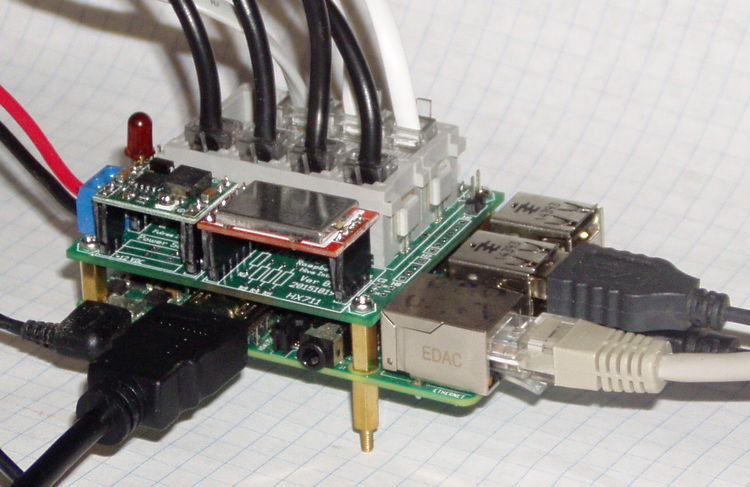
| − | + | [[File:P1010016c.jpg|thumb|750px|Dev Kit PCB installed on a Pi 2.]] | |
==Parts== | ==Parts== | ||
| Line 6: | Line 6: | ||
[[Media:PT-JGT(X)(XXX).jpg| Mechanical Drawing for RJ connectors.]] | [[Media:PT-JGT(X)(XXX).jpg| Mechanical Drawing for RJ connectors.]] | ||
| + | <br clear=all> | ||
| + | ==Board Layout== | ||
| + | === Version 0.2=== | ||
| + | 21 of these boards were released. | ||
| + | <gallery mode=packed heights=200px> | ||
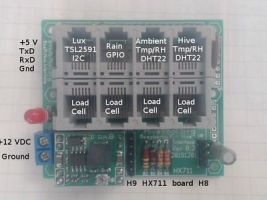
| + | File:Shot0055.jpg|Connectors. | ||
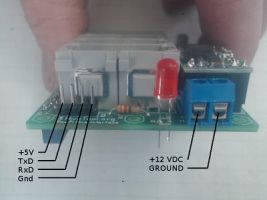
| + | File:Shot0054.jpg|Console and 12 V power supply option 1. | ||
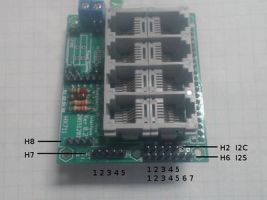
| + | File:Shot0001.jpg|Spare GPIO, I2C and I2S headers. | ||
| + | </gallery> | ||
| + | === Version 0.3=== | ||
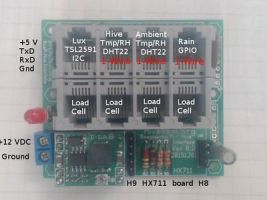
| + | 43 of these boards were released. The rain gauge was moved to a different GPIO pin. The 1-Wire bus was brought out to spare pins on the DHT22 and rain gauge connectors. The DHT22 and rain gauge connector were moved. The order of the signals on H6, the I2S connector, was changed. | ||
| − | == | + | <gallery mode=packed heights=200px> |
| + | File:Shot0055.03.jpg|1-Wire connections added | ||
| + | </gallery> | ||
| + | <br clear=all> | ||
==Assembly== | ==Assembly== | ||
| − | 1.Insert the 2x20 female header from the bottom side of the board. | + | |
| + | ===40 pin header=== | ||
| + | 1. Insert the 2x20 female header from the bottom side of the board, tack two pins, and check that the header is all the way down on the board and is straight. | ||
<gallery mode=packed heights=200px> | <gallery mode=packed heights=200px> | ||
Image:Shot0005.jpg|'''1.1 Insert the header from the bottom.''' | Image:Shot0005.jpg|'''1.1 Insert the header from the bottom.''' | ||
| Line 18: | Line 34: | ||
</gallery> | </gallery> | ||
| − | 2. | + | 2. After checking and adjusting alignment, solder the rest of the header pins on the top (component, silk screen) side of the board. |
<gallery mode=packed heights=200px> | <gallery mode=packed heights=200px> | ||
Image:Shot0012.jpg|'''2.1 Solder the rest of the pins.''' | Image:Shot0012.jpg|'''2.1 Solder the rest of the pins.''' | ||
</gallery> | </gallery> | ||
| − | + | ===Resistors=== | |
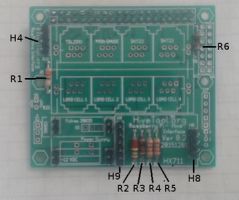
| + | Insert the resistors in the board. If you do not plan to monitor a 12 volt supply, you may not need R2-R5. If you do not plan to use a rain gauge, you may not need R6. R1 controls the brightness of the LED. The larger the value, the less current and the dimmer the LED. The hive interface board ships with mostly 1% resistors as they are about the same price as 5%, but some of the resistors may be 5% (like R1) as I have decided the exact value yet | ||
| + | |||
| + | A gold band means it is a 5% resistor. The one percent resistors have an extra color band as they have an additional significant digit. | ||
| + | |||
{| class="wikitable" | {| class="wikitable" | ||
| + | |- | ||
| + | ! scope="col"| Number | ||
| + | ! scope="col"| Value (Ohms) | ||
| + | ! scope="col"| Color Code | ||
| + | ! scope="col"| Purpose | ||
|- | |- | ||
|R1 | |R1 | ||
| − | |330 | + | |330<br>470<br>560 |
| − | |Controls brightness of LED | + | |orange orange brown<br>yellow violet brown<br>green blue brown |
| + | |Controls brightness of LED.<br>Note: Use only value. It may have a gold band (5%). | ||
|- | |- | ||
|R2 | |R2 | ||
|200K | |200K | ||
| + | |red black yellow<br>red black black orange (1%) | ||
|12 V monitoring voltage divider | |12 V monitoring voltage divider | ||
|- | |- | ||
|R3 | |R3 | ||
|1K | |1K | ||
| + | |brown black red<br>brown black black brown (1%) | ||
|12 V monitoring voltage divider | |12 V monitoring voltage divider | ||
|- | |- | ||
|R4 | |R4 | ||
|2.2K | |2.2K | ||
| + | |red red red<br>red red black brown (1%) | ||
|12 V monitoring Reference voltage divider | |12 V monitoring Reference voltage divider | ||
|- | |- | ||
|R5 | |R5 | ||
|2.2K | |2.2K | ||
| + | |red red red<br>red red black brown (1%) | ||
|12 V monitoring Reference voltage divider | |12 V monitoring Reference voltage divider | ||
|- | |- | ||
|R6 | |R6 | ||
|1K | |1K | ||
| + | |brown black red<br>brown black black brown (1%) | ||
|Rain gauge input filter | |Rain gauge input filter | ||
|} | |} | ||
<gallery mode=packed heights=200px> | <gallery mode=packed heights=200px> | ||
| − | Image:Shot0015.jpg|''' | + | Image:Shot0015.jpg|'''2.1 Insert the resistors.''' |
</gallery> | </gallery> | ||
| − | + | ===Male headers=== | |
| + | '''Required''' | ||
# H8 1x4 and H9 1x6 for the HX711 board. | # H8 1x4 and H9 1x6 for the HX711 board. | ||
| + | '''Optional''' | ||
# H4 1x4 for console serial port | # H4 1x4 for console serial port | ||
| + | # H2 1x5 for I2C (For developers. Not used by current software or sensors.) | ||
| + | # H6 1x5 for spare GPIO (For developers. Not used by current software or sensors.) | ||
| + | # H7 1x7 for I2s (For developers. Not used by current software or sensors.) | ||
| + | # 4 1x2 for 12 V power supply option 1. | ||
<gallery mode=packed heights=200px> | <gallery mode=packed heights=200px> | ||
| Line 63: | Line 100: | ||
</gallery> | </gallery> | ||
| − | #Install RJ1 and RJ2. Be very careful to check that all the leads are in the holes before you snap it in | + | ===Capacitors=== |
| + | {| class="wikitable" | ||
| + | |- | ||
| + | ! scope="col"| Number | ||
| + | ! scope="col"| Value (Ohms) | ||
| + | ! scope="col"| Purpose | ||
| + | |- | ||
| + | |C1 | ||
| + | |4.7 mfd. Electrolytic | ||
| + | |Power supply filter. | ||
| + | |- | ||
| + | |C3 | ||
| + | |0.1 mfd Tantalum | ||
| + | |Rain gauge filter. | ||
| + | |} | ||
| + | |||
| + | #Install C3 .1 mfd. for rain gauge filter. Observe polarity if tantalum. The longest lead (positive) goes in the square pad. | ||
| + | #Install C1 4.7 mfd. Observe polarity. The positive lead goes in the square hole. | ||
| + | |||
| + | ===RJ1 and RJ2=== | ||
| + | <gallery mode=packed heights=200px> | ||
| + | File:Shot0034.jpg|Align latch pins with holes. | ||
| + | File:Shot0036.jpg|Check alignment before snapping in place. | ||
| + | File:Shot0038.jpg|Check all 16 pins stick through the holes before soldering. | ||
| + | </gallery> | ||
| + | |||
| + | #Orient the 4 port RJ jack to match the parts legend on the top of the board. | ||
| + | #Gently hold the 4 port RJ jack on the top of the board, carefully aligning the longer latch pins on each side with the holes. When the latching pins go into the holes, the connector will "seat" and move slightly towards the board. | ||
| + | #While gently holding the RJ jack on the board, turn the board over and inspect the 16 leads. Make sure that each one is lined up with a hole. | ||
| + | #If all the pins are lined up, firmly press the connector in by squeezing between thumb and fingers on each end and snap it in place. | ||
| + | |||
| + | Be very careful to check that all the leads are in the holes before you snap it in and solder it. | ||
| + | |||
| + | If a pin won't line up with a hole, it must be manipulated with a needle nose pliers until it will. | ||
| + | |||
| + | ===Solder shield on the HX711 board=== | ||
| + | |||
| + | [[File:H711_solder_shield2.jpg|thumb|400px| Solder shield on HX711 board.]] | ||
| + | |||
| + | Solder shield on HX711 board. | ||
| + | #Place the shield over the components making sure all 5 tabs go into the holes. | ||
| + | #Turn board over and solder all 5 tabs. | ||
| + | |||
| + | ===Install the HX711 board=== | ||
#Insert the 1x4 and 1x6 female headers on the make headers. | #Insert the 1x4 and 1x6 female headers on the make headers. | ||
| − | # | + | #Place the HX711 board on top of the 1x4 and 1x6 female headers. |
| − | # | + | #Solder the 10 connections on the two headers. |
| − | |||
| − | |||
| − | |||
| − | Power Supply 1 | + | ===LED=== |
| − | # | + | #Install LED D1. Observe polarity. The longest lead (positive) goes in the square pad. |
| − | # | + | |
| + | ===12 VDC power supply if used.=== | ||
| + | |||
| + | |||
| + | ====Power Supply Option 1: D-SUN==== | ||
| + | <div style="background-color: yellow; font-weight: bold; font-family:arial;color:#FF0000;font-size:20px;text-align:center;">'''WARNING: If you use the D-SUN 12 volt power supply it must be adjusted before you plug in the HX711 board or plug the board into the Pi!''' <br>Failure to set the output of the 12 v supply to 5 volt will fry the HX711, Pi, SD card, USB peripherals.</div> | ||
| + | |||
| + | <gallery mode=packed heights=400px> | ||
| + | File:Shot0045.jpg|Place the 4 1x2 female headers on the male headers. | ||
| + | File:Shot0046.jpg|Place the D-Sun power supply board on the 4 1x2 female headers and solder. | ||
| + | </gallery> | ||
| + | |||
| + | #Solder four 1x2 male headers. | ||
| + | #Solder blue screw terminal block. Make sure openings for wire face out. | ||
#Install four 1x2 female headers on the four 1x2 male headers. | #Install four 1x2 female headers on the four 1x2 male headers. | ||
| − | # | + | #Solder the Power Supply board on the four 1x2 female headers. |
| + | |||
| + | ====Power Supply Option 2: Fulree==== | ||
| + | <div style="background-color: yellow; font-weight: bold; font-family:arial;color:#FF0000;font-size:16px;text-align:center;">'''Use of this power supply is not recommended and will be dropped from future versions of this interface board.''' </div> | ||
| + | |||
| + | |||
| − | |||
#Install Fulree voltage regulator | #Install Fulree voltage regulator | ||
#Install green spring terminal block. | #Install green spring terminal block. | ||
==Testing== | ==Testing== | ||
| + | <div style="background-color: yellow; font-weight: bold; font-family:arial;color:#FF0000;font-size:20px;text-align:center;">'''WARNING: Do Not plug the hive interface board into the Pi. Remove the HX711 board before applying 12 volts'''</div> | ||
| + | |||
| + | If using Power Supply Option 1, the voltage must be adjusted to 5.0 to 5.1 volts before connecting to the Pi or HX711 board. | ||
| + | |||
| + | To adjust the D-Sun power supply, connect a volt meter between ground and a +5 point. That can be the positive output of the D-Sun board, either pins 2 or 4 of H1 or pin 1 of H4, H6 or H7. Ground can be the negative terminal on the 12 volt supply. I usually use a 12 volt battery but a current limited supply would be best. | ||
| + | |||
| + | The trim pot (variable potentiometer) is 1/4" square device with the round silver piece on top. It has a slot shaped like a + (cross) on the top. You will need a small jeweler screw driver. There is no stop and it will turn all the way around (360 degrees). I try to adjust the output to between 5.0 and 5.1 volts. Usually to 5.05 to 5.08. It is very touchy. When you get it to 5 volts, you don't actually turn it, but just put pressure on it the way you need to adjust it. | ||
Latest revision as of 15:41, 17 April 2016
Contents
Parts
Mechanical Drawing for RJ connectors.
Board Layout
Version 0.2
21 of these boards were released.
Version 0.3
43 of these boards were released. The rain gauge was moved to a different GPIO pin. The 1-Wire bus was brought out to spare pins on the DHT22 and rain gauge connectors. The DHT22 and rain gauge connector were moved. The order of the signals on H6, the I2S connector, was changed.
Assembly
40 pin header
1. Insert the 2x20 female header from the bottom side of the board, tack two pins, and check that the header is all the way down on the board and is straight.
- Error creating thumbnail: File missing
1.1 Insert the header from the bottom.
- Error creating thumbnail: File missing
1.2 Solder one pin on each end.
- Error creating thumbnail: File missing
1.3 Check the connector for alignment.
- Error creating thumbnail: File missing
1.4 Melt solder and straighten.
2. After checking and adjusting alignment, solder the rest of the header pins on the top (component, silk screen) side of the board.
- Error creating thumbnail: File missing
2.1 Solder the rest of the pins.
Resistors
Insert the resistors in the board. If you do not plan to monitor a 12 volt supply, you may not need R2-R5. If you do not plan to use a rain gauge, you may not need R6. R1 controls the brightness of the LED. The larger the value, the less current and the dimmer the LED. The hive interface board ships with mostly 1% resistors as they are about the same price as 5%, but some of the resistors may be 5% (like R1) as I have decided the exact value yet
A gold band means it is a 5% resistor. The one percent resistors have an extra color band as they have an additional significant digit.
| Number | Value (Ohms) | Color Code | Purpose |
|---|---|---|---|
| R1 | 330 470 560 |
orange orange brown yellow violet brown green blue brown |
Controls brightness of LED. Note: Use only value. It may have a gold band (5%). |
| R2 | 200K | red black yellow red black black orange (1%) |
12 V monitoring voltage divider |
| R3 | 1K | brown black red brown black black brown (1%) |
12 V monitoring voltage divider |
| R4 | 2.2K | red red red red red black brown (1%) |
12 V monitoring Reference voltage divider |
| R5 | 2.2K | red red red red red black brown (1%) |
12 V monitoring Reference voltage divider |
| R6 | 1K | brown black red brown black black brown (1%) |
Rain gauge input filter |
- Error creating thumbnail: File missing
2.1 Insert the resistors.
Male headers
Required
- H8 1x4 and H9 1x6 for the HX711 board.
Optional
- H4 1x4 for console serial port
- H2 1x5 for I2C (For developers. Not used by current software or sensors.)
- H6 1x5 for spare GPIO (For developers. Not used by current software or sensors.)
- H7 1x7 for I2s (For developers. Not used by current software or sensors.)
- 4 1x2 for 12 V power supply option 1.
Capacitors
| Number | Value (Ohms) | Purpose |
|---|---|---|
| C1 | 4.7 mfd. Electrolytic | Power supply filter. |
| C3 | 0.1 mfd Tantalum | Rain gauge filter. |
- Install C3 .1 mfd. for rain gauge filter. Observe polarity if tantalum. The longest lead (positive) goes in the square pad.
- Install C1 4.7 mfd. Observe polarity. The positive lead goes in the square hole.
RJ1 and RJ2
- Error creating thumbnail: File missing
Align latch pins with holes.
- Error creating thumbnail: File missing
Check alignment before snapping in place.
- Error creating thumbnail: File missing
Check all 16 pins stick through the holes before soldering.
- Orient the 4 port RJ jack to match the parts legend on the top of the board.
- Gently hold the 4 port RJ jack on the top of the board, carefully aligning the longer latch pins on each side with the holes. When the latching pins go into the holes, the connector will "seat" and move slightly towards the board.
- While gently holding the RJ jack on the board, turn the board over and inspect the 16 leads. Make sure that each one is lined up with a hole.
- If all the pins are lined up, firmly press the connector in by squeezing between thumb and fingers on each end and snap it in place.
Be very careful to check that all the leads are in the holes before you snap it in and solder it.
If a pin won't line up with a hole, it must be manipulated with a needle nose pliers until it will.
Solder shield on the HX711 board
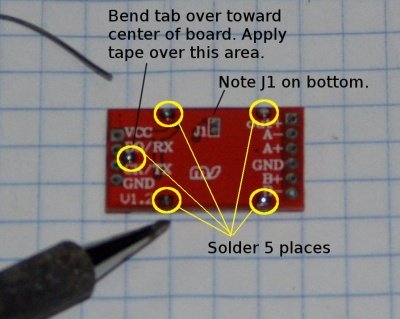
Solder shield on HX711 board.
- Place the shield over the components making sure all 5 tabs go into the holes.
- Turn board over and solder all 5 tabs.
Install the HX711 board
- Insert the 1x4 and 1x6 female headers on the make headers.
- Place the HX711 board on top of the 1x4 and 1x6 female headers.
- Solder the 10 connections on the two headers.
LED
- Install LED D1. Observe polarity. The longest lead (positive) goes in the square pad.
12 VDC power supply if used.
Power Supply Option 1: D-SUN
Failure to set the output of the 12 v supply to 5 volt will fry the HX711, Pi, SD card, USB peripherals.
- Solder four 1x2 male headers.
- Solder blue screw terminal block. Make sure openings for wire face out.
- Install four 1x2 female headers on the four 1x2 male headers.
- Solder the Power Supply board on the four 1x2 female headers.
Power Supply Option 2: Fulree
- Install Fulree voltage regulator
- Install green spring terminal block.
Testing
If using Power Supply Option 1, the voltage must be adjusted to 5.0 to 5.1 volts before connecting to the Pi or HX711 board.
To adjust the D-Sun power supply, connect a volt meter between ground and a +5 point. That can be the positive output of the D-Sun board, either pins 2 or 4 of H1 or pin 1 of H4, H6 or H7. Ground can be the negative terminal on the 12 volt supply. I usually use a 12 volt battery but a current limited supply would be best.
The trim pot (variable potentiometer) is 1/4" square device with the round silver piece on top. It has a slot shaped like a + (cross) on the top. You will need a small jeweler screw driver. There is no stop and it will turn all the way around (360 degrees). I try to adjust the output to between 5.0 and 5.1 volts. Usually to 5.05 to 5.08. It is very touchy. When you get it to 5 volts, you don't actually turn it, but just put pressure on it the way you need to adjust it.
